How to Build an Oil Painting from Scratch
When it comes to painting in oils, it takes time, patience and care to create your artistic vision. Oil paints are not the easiest medium to work with, but the results can be astonishing and with persistence, it will pay off as you learn to manipulate the paint. Soon you will find that the paint flows easily, it doesn’t dry too quickly like acrylic paint, giving you time and flexibility and the colours can be so vibrant and alive.
Oil paints can be toxic and highly flammable, so it is wise to work in a well-ventilated room and to wear gloves to protect your hand whilst you paint. Stretched canvases are already primed but often artists will paint an under layer of acrylic paint over the surface of a canvas before they begin to apply oil paints. This serves to speed up the initial stages of an oil painting and to get a thin, washy, saturated base to work on top of and to act as a foundation for a painting with some built in contrast and tonal values.
Oil paints can dry extremely slowly, depending on how many layers and the thickness of paint applied. Even if the surface feels dry, the paint underneath may still be wet. There are two rules to painting in oils: 1. Paint fat over lean and 2. Never layer acrylics over oil paints.
To ‘paint fat over lean’ means that you should begin your painting with thin washes of paint, and as you progressively build up the layers, use less turpentine or white spirit and more oil-based medium like Linseed oil, otherwise the layers of paint will dry unevenly. Over time the surface of your artwork will crack. The same applies to layering acrylics and oil paints. Always put oils on top of acrylics if you don’t want the paint to crack.
The first few layers of paint should be of a thinner consistency and the final layers thicker. Linseed oil works to slow the drying time, whilst Liquin will speed it up.
Oil paint consists of particles of pigment suspended in a drying oil (usually linseed oil). The thickness of the paint can be adjusted by adding a solvent such as turpentine or white spirit or oil-based medium. Varnish can also be added to increase the glossiness of the dried oil paint film.
Oil paint brushes of different thickness or painting with a palette knife to develop your skill and technique as an artist, can be useful and help you to be more expressive.
I always begin with a sketch directly onto the canvas either in pencil, charcoal or paint.
Practice makes perfect when learning to paint with oils and you will find it fascinating to see the evolution of your art as you progress. Oil painting is one of the most rewarding methods of painting and the results can be amazing.
1 Begin with a sketch and a thin layer of paint

Sketch on stretched canvas in pencil. Adding oil paints in thin layers.
It doesn’t matter how rough the sketch is, as long as you have a good idea of your painting composition mapped out.
2 Concentrate on one area at a time

On some of my paintings, I find it easier to concentrate on one area at a time and build up from there.
Here the paint has been applied wet on wet, layer upon layer, in different coloured pigments, working slowly with small brush strokes.
3 Painting around the main subject

Working with one colour, begin to paint in the background.
If you paint over part of the main subject, this can be corrected in the final stage of the painting.
4 Adding further detail and texture
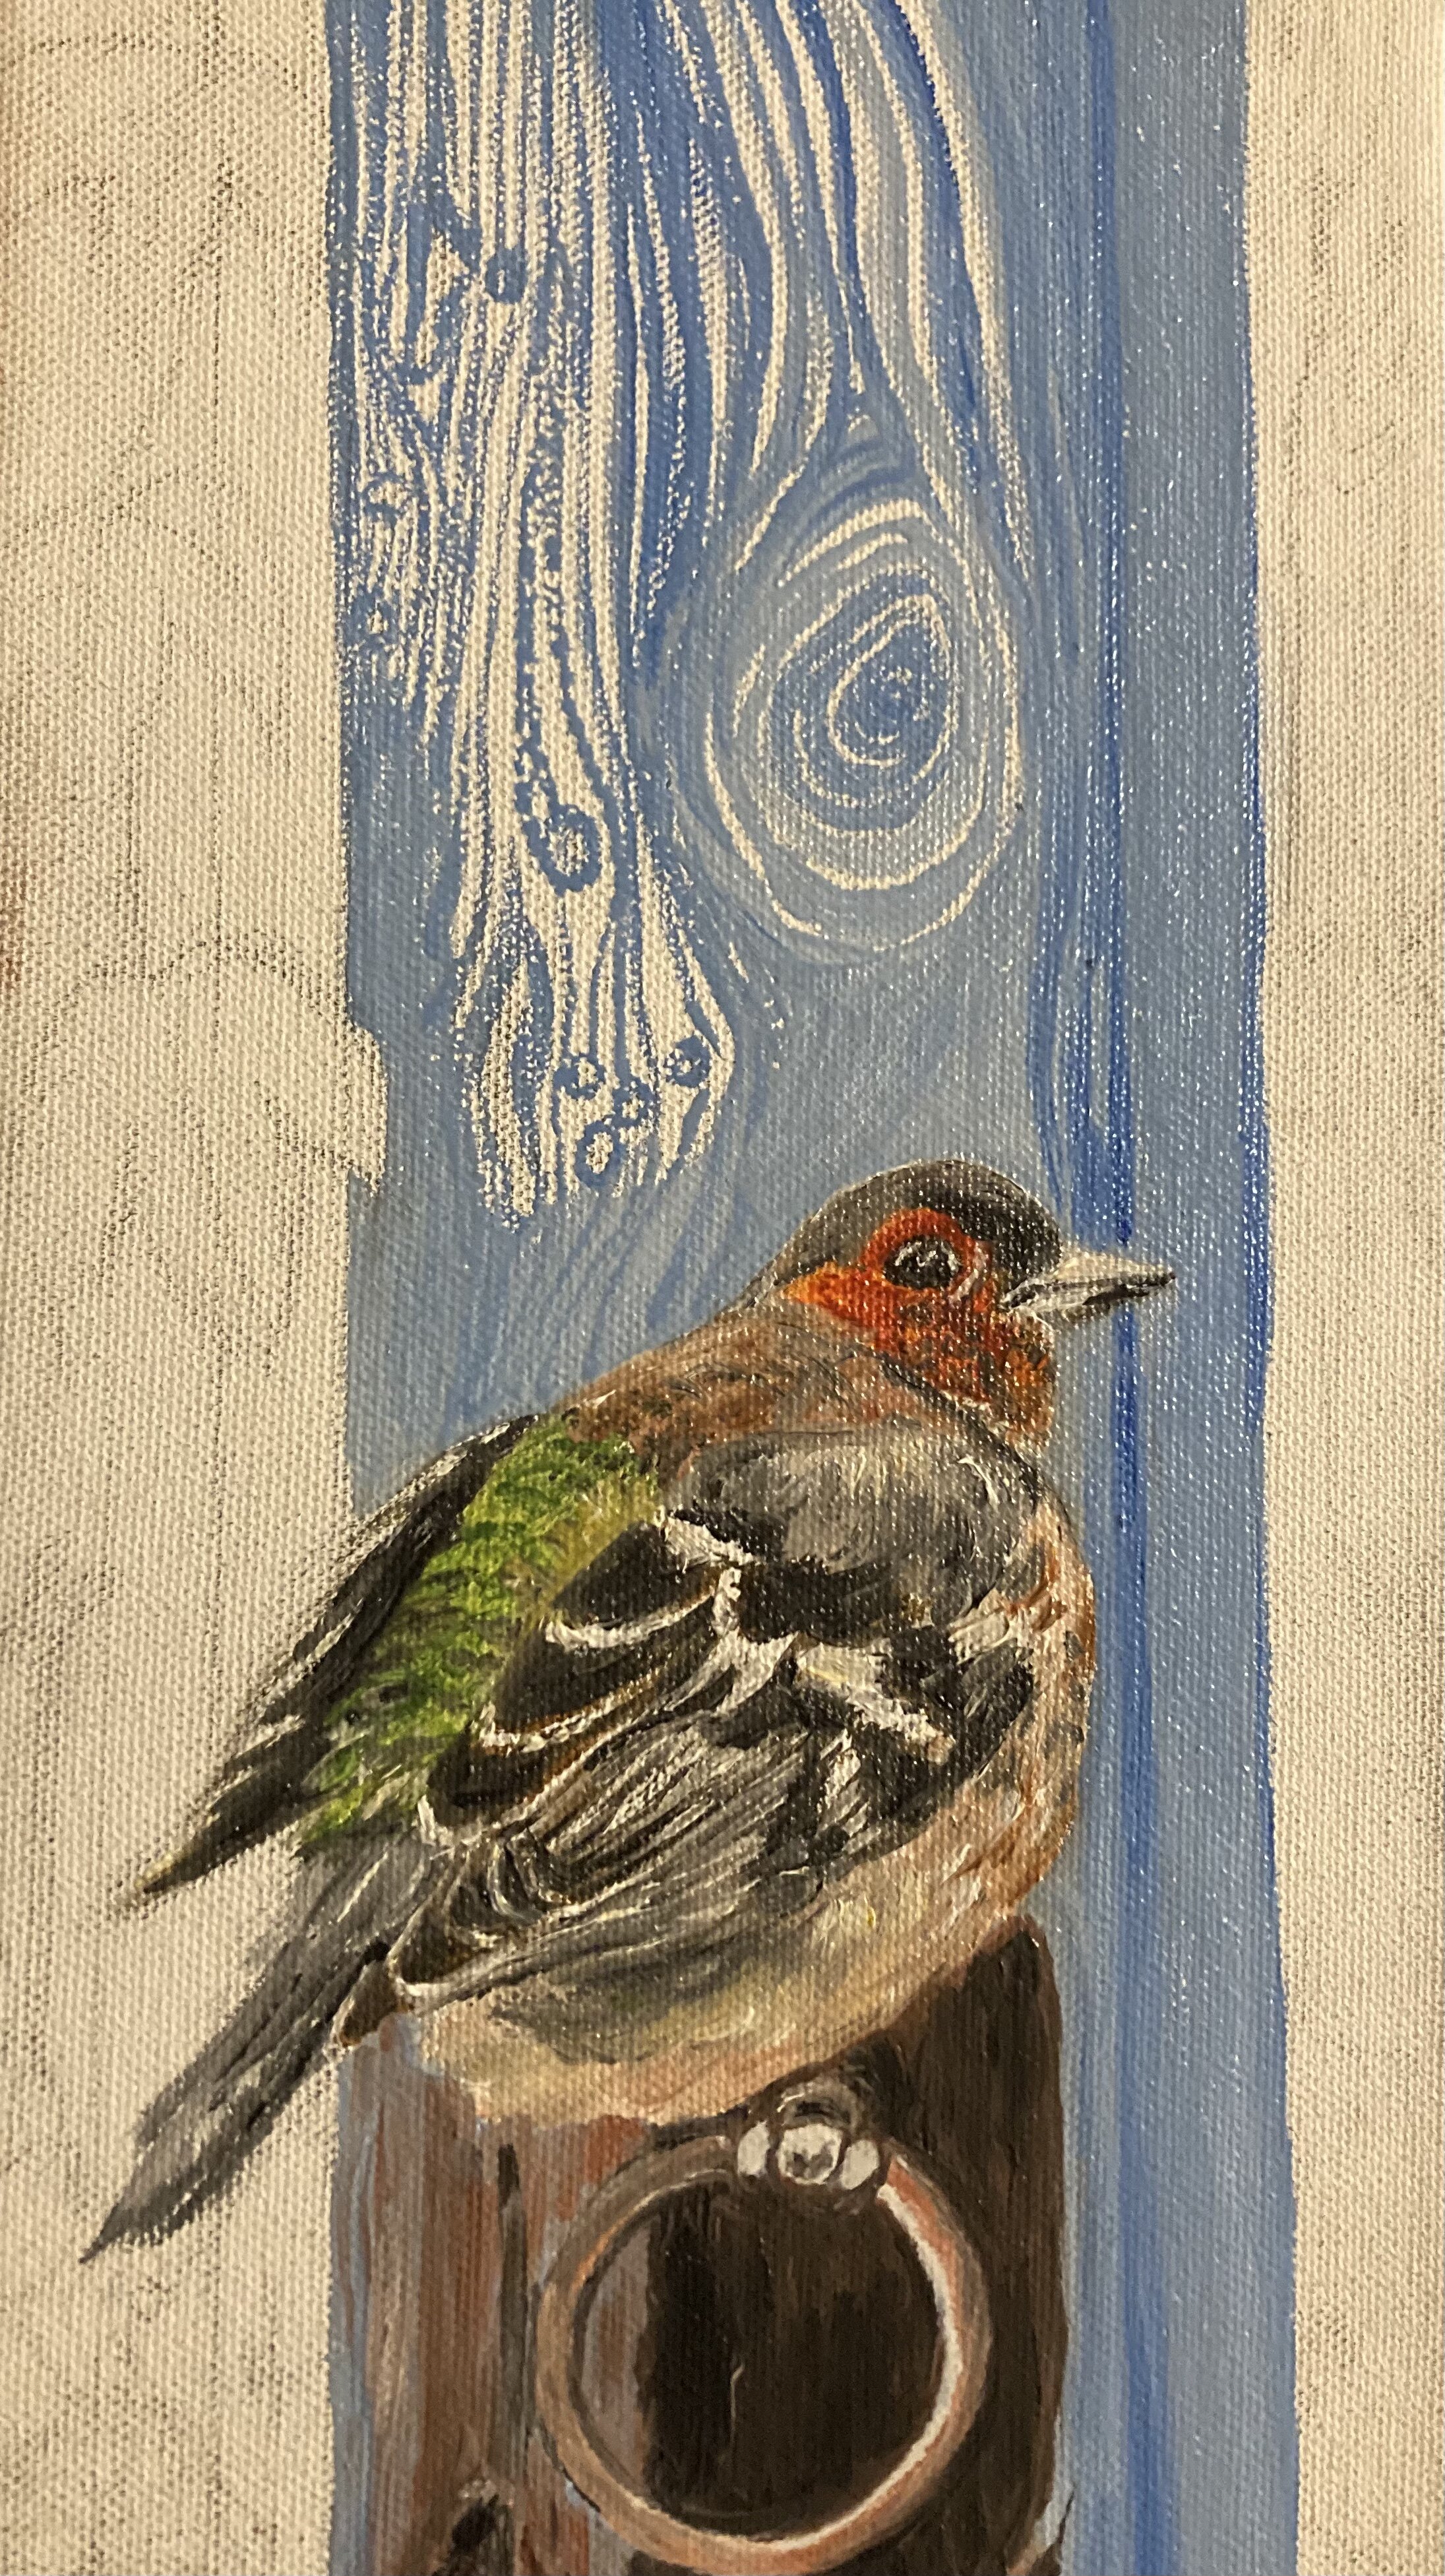
Here, you can see the wood texture and detail being developing a with an underlay in one colour pigment.
Further pigments of oil paint are added on top in different colours.
5 Adding more detail, flowers and leaves

The wooden backdrop is further layered with different coloured pigments.
The leaves and flower images are beginning to take on layers too.
6. Completing the details
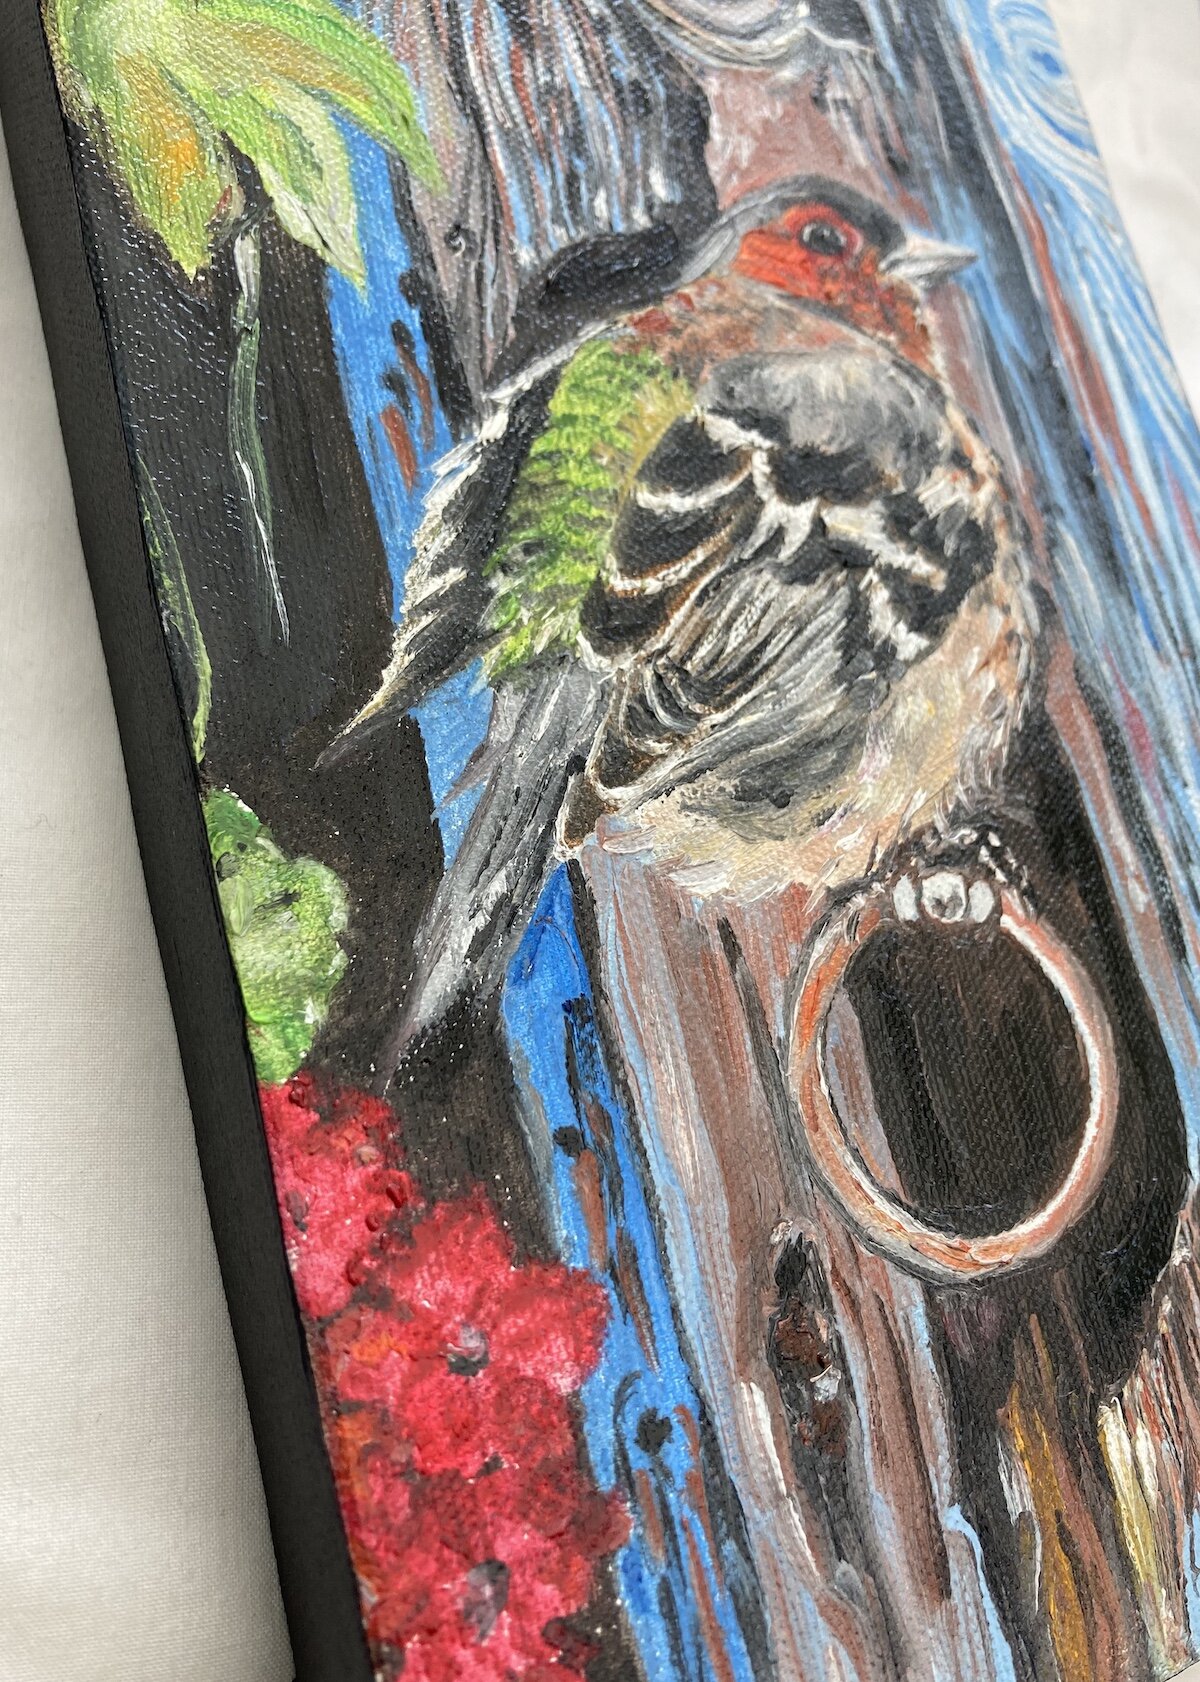
In the final stages, check all aspects of the painting to ensure that the details are correct and as you want the finished piece to look.
Paint the edges of the canvas too.
7. Framing and the finished painting

Presenting the finished artwork is important and choosing the right frame to complement the piece.
The canvas is a small, stretched canvas sized 6 inches by 12 inches, with a thick edge of 1.5 inches. Here it is framed in a gold floater flame where the painting sits like in a tray.
The painting is called ‘Naughty Chaffinch’, oil on canvas. The inspiration came from a trip with my daughter to Emmetts Hillside garden a National Trust site. This Edwardian estate stands at one of the highest points in Kent, looking over the Weald and was created in the late 19th century.
It was a cold Spring morning and stopping for a moment to sit on a bench to eat our sandwiches, there were some chaffinches fluttering by a nearby tree. Chaffinches are small, beautifully coloured birds and quite bold. I had never seen them up close before and It was fascinating to watch several of them playing in the sunshine as they flew to the ground, then up to the low branches of a tree and back again. I contrasted the colours of the chaffinch’s feathers, complemented by the wooden door backdrop and geranium flowers and leaves.
Nature offers us the freedom and relief from our day to day lives, if only for a moment. Studying birds is a great pastime and they will always be my inspiration. I hope you enjoy this blog and that it offers you some insight into painting with oils.
Warmly,
Patricia
‘Love, Joy, Create’ Blog – My love of nature inspires my art practice. Learning from nature, seeing animals and birds fills me with joy. Please follow along with me and create your own inspiration for your art by learning about nature and the world around us. art@patriciajvalentiart.com
Patricia Valenti is a representational contemporary fine artist and life-long painter, based in Kent in the UK, beginning her artistic studies as a young girl. Her passion for nature and the beauty of animals and wildlife can be seen in her work, transforming familiar animals and wildlife into stunning, realistic interpretations with emotional impact. Her walks around the surrounding countryside near her home inspire her work.